In the Bercode issuer services role, Sticker management menu, Sticker order submenu you can order new stickers from the graphics of an already designed sticker, as well as review your previous orders.
- Before ordering again, check the bercode use limit! If the number of pieces in the limit is not sufficient for a new order, you can increase the bercode limit in the Purchase Bercode credit submenu.
- Use the New order button to initiate and parameterize new sticker orders.
New order:
- When entering a Delivery address, you can select a (central) address or even request that the order will be delivered for each customer separately.
Use the Sticker data table to upload the information related to the new order. Be sure to use lowercase, uppercase, accents, hyphens. (If the table does not appear in your browser, please press Ctrl+F5.)
- When you enter a date, the table will automatically offer you a good one-year validity by clicking on that cell, but you can rewrite it at any time (in YYYY-MM-DD format).
- When selecting a bercode level, you can use the names specified in the drop-down menu by clicking on the cell, but you can also enter them manually (or copy them from your own table).
- You can even place custom text on the sticker. Double-click to display the text related to the sticker graphics, from which you can select the one that suits you.
- If necessary, you can delete the data in the Table.
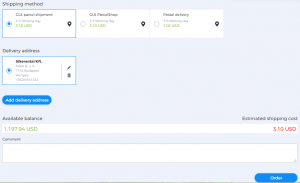
Shipping method and Delivery address settings
- Choose whether you want your sticker(s) delivered to a GLS parcel point or to your door!
- The shipping address shows the address specified when setting up the Partner Profile. You can change, delete, and enter a New Delivery Address.
Expected shipping costs are displayed. Make sure that the shipping cost does not exceed the available balance! In the Comment field, you can include your comments about the order and delivery. Click the Order button to finalize your order.

